Store Mapping
Overview
fritz2 uses stores to manage the application state by holding a data model. But quite often the data does
not fit into the desired UI-fragment out of the box. This is often due to the normalized form which avoids redundancy
as much as possible. Also, HTML can only render Strings at the end of the day, but the correct String representation
of data types differs from case to case, and we do not want to store those explicitly.
In order to support clean data management and compromise well between data and UI-shape, fritz2's stores offer a powerful concept: store mapping.
Remember the map-function from collections where a source type T is transformed to another type R
inside of an expression? We can also map a store in order to change its source type to a more suitable type.
However, there is one big difference between the classical map-function and the store's mapping functions: A store
needs both a getter-function from T -> R and a setter-function from R -> T to manage changes.
Lenses
If you are unfamiliar with the universal concept for the functionality called lens in computer science, take a look at the excellent documentation on lenses from the arrow-project before reading on. We are about to give you a short intro to lenses, and further discuss them later in the Essentials section Lenses in Depth.
fritz2 offers the method lensOf() for a short-and-sweet-experience which accepts a getter- and
a setter-expression:
val nameLens: Lens<Person, String> = lensOf({ it.name }, { person, value -> person.copy(name = value) })This lens can be used to access the name-property of a Person, or to create a new person with changed name:
val fritz2 = Person(1, "fritz2")
val nameOfFritz2: String = nameLens.get(person) // nameOfFritz2 = "fritz2"
val hugo: Person = nameLens.set(fritz2, "hugo") // hugo = Person(1, "hugo")
As you can see, there is no magic, just plain old function calling.
Let's take a step back and explore how the concept of lenses can be used to map one store to another.
Mapping Stores Using Lenses
Imagine a use case where the interests of a person are rendered as tags - comma seperated values. They can be changed by typing them as CSV.
But in order to further process these interests, it makes more sense to store them in a List<Interest>, so that will
be the canonical state representation in our application:
val interestsStore: Store<List<Interest>> = storeOf(emptyList(), job = Job())However, this representation does not fit the requirements of the specific UI-fragment - but no worries! Simply define
a Lens that does the mapping between the list and the String based CSV representation:
val interestLens: Lens<List<Interest>, String> = lensOf(
    List<Interest>::joinToString, // getter
    { it.split(",").map { Interest.valueOf(it.trim()) } } // setter
)
Armed with this lens, we can map the interest-store and use the resulting store in the UI:
val interestsStore: Store<List<Interest>> = storeOf(emptyList(), job = Job())

val interestLens: Lens<List<Interest>, String> = lensOf(
    List<Interest>::joinToString,
    { it.split(",").map { Interest.valueOf(it.trim()) } }
)

val csvInterests: Store<String> = interestsStore.map(interestLens)
//  ^^^^^^^^^^^^^^^^^^^^^^^^^^^                  ^^^^^^^^^^^^^^^^^
//  Create a new store with the                  Use the `map` function to map the store
//  desired type (2nd of the `Lens`)             and provide the lens for the transformations

render {
    h1 { +"Choose Interests from:" }
    p { +Interest.values().joinToString() }
    input {
        label { +"Interests:" }
        // reactively connect the input to the mapped CSV representation store
        value(csvInterests.data)
        changes.values() handledBy csvInterests.update
    }
    h1 { +"Chosen Interests:" }
    csvInterests.data.renderText()

    // just to demonstrate that the original store is always in sync with the mapped one:
    interestsStore.data handledBy { interests ->
        console.log(interests)
    }
}
As you can see, the mapped store fits perfectly to the desired (yet a little artificial) requirements for the UI: There is no mapping inside the UI, nor are there any custom handlers or data-flows in the store.
But to be fair, the manual creation of the lens is heavy work. So fritz2 offers more tools to make lens generation easier, especially for the use case of destructuring complex model types.
Essentials
Lenses in Depth
Most of the time, a model for a view will not be of a simple data-type but a complex entity, like a person having a name, multiple addresses, an email, a date of birth, etc.
In those cases, you will most likely need Stores for the properties of your main entity, and - later on - for
the properties of the child-entity like the street in an address in our example from above.
fritz2 again uses Lenses to describe the relationship between an entity and its child-entities and
properties.
A Lens is basically a way to describe the relation between an outer and inner entity in a structure. It focuses on the
inner entity from the viewpoint of the outer entity, which is how it got its name. Lenses are especially useful when
using immutable data-types like fritz2 does.
A Lens needs to handle the following:
- Getting the value of the inner entity from a given instance of the outer entity
- Creating a new instance of the outer entity (immutable!) as a copy of a given one with a different value only for the inner entity
In fritz2, a Lens is defined by the following interface:
interface Lens<P,T> {
    val id: String
    fun get(parent: P): T
    fun set(parent: P, value: T): P
}
All you do to benefit is implement the functions get() and set(), or use the lensOf() function we discussed in
previous sections:
val nameLens = lensOf("name", { it.name }, { person, value -> person.copy(name = value) })No magic there. The first parameter sets an id for the Lens. When using Lenses with Stores,
the id will be used to generate a valid HTML id representing the path through your model.
This can be used to identify your elements semantically (for validation or automated ui-tests for example).
If you have deep nested structures or a lot of them, you may want to automate this behavior.
fritz2 offers a @Lenses annotation you can add to your data-classes, sealed-classes and sealed-interfaces in the
commonMain source-set of your multiplatform project:
@Lenses
data class Person(val name: String, val value: String) {
    companion object // needs to be declared! The generated lens-factories are created within.
}
Using an annotation-processor, fritz2 builds factory methods for each public constructor property within the
companion object of the data class from these annotations which contains all the Lenses you need.
They are named exactly like the entities and properties, so it's easy to use:
val nameLens = Person.name()You can see it in action at our nestedmodel-example.
Keep in mind that your annotated classes have to be in your commonMain source-set,
otherwise the automatic generation of the lenses will not work!
Have a look at the validation-example to see how to set it up.
This will also help you define a multiplatform project for sharing your model and validation code between the browser and backend.
There are other lenses generated as well. Especially when dealing with sealed-hierarchies, fritz2 offers more
helpful variants that are commonly needed to apply different idioms and patterns like validation or holding the base
type in some Store for type based UI design.
You can find out more in the two applications described in the sections Dealing with Sealed Type Hierarchies and Delegating Validation in Sealed Hierarchies.
Destructuring Complex Models With Mapped Stores and Lenses
Having a Lens available which points to some specific property makes it very easy to get a Store for that
property from an original Store of the parent entity:
// given the following nested data classes...
@Lenses
data class Name(val firstname: String, val lastname: String) {
    companion object
}

@Lenses
data class Person(val name: Name, description: String) {
    companion object
}

// ... you can create a root-store...
val personStore = storeOf(Person(Name("first name", "last name"), "more text"), job = Job())
// ... and a derived store using the automatic generated lens-factory `Person.name()`
val nameStore = personStore.map(Person.name())
Now you can use your nameStore exactly like any other Store to set up two-way data binding. Call map(...)
again to access the properties of Name. If a Store contains a List, you can of course iterate over it by
using renderEach(). It's fully recursive from here on down to the deepest nested parts of your model.
Remember that you can also add Handlers to your Stores
by simply calling the handle method:
val booleanChildStore = parentStore.map(someLens)
val switch = booleanChildStore.handle { model: Boolean ->
    !model
}

render {
    button {
        +"switch state"
        clicks handledBy switch
    }
}
To keep your code well-structured, it is recommended to implement complex logic in your Store or inherit it by
using interfaces. However, the code above is a decent solution for small (convenience-)handlers.
Calling map on a Store With Nullable Content
Calling map on a nullable Store only makes sense when you have checked that its state is not null:
@Lenses
data class Person(val name: String)

//...

val storedPerson = storeOf<Person?>(null, job = Job())

//...

storedPerson.data.render { person ->
    if (person != null) { // Avoid NullPointerExceptions reading or updating storedPerson
                          // by manually creating a safe scope ensuring that person is not null
        val storedName = storedPerson.map(Person.name())
        input {
            value(storedName.data)
            changes.values() handledBy storedName.update
        }
    }
    else {
        p { + "No customer selected" }
    }
}
Handling Nullable States in Stores
If you have a Store with a nullable state, you can use mapNull to derive a non-nullable Store from it which
transparently translates a null-value from its parent Store to the given default-value and vice versa.
After text is entered into and then removed from the input of the following example, nameStore will have a state of
null:
val nameStore = storeOf<String?>(null, job = Job())

render {
    input {
        nameStore.mapNull("").also { formStore ->
            value(formStore.data)
            changes.values() handledBy formStore.update
        }
    }
}
In the real world, you will often come across nullable attributes of complex entities. Call mapNull
directly on the Store you create to use with your form elements:
@Lenses
data class Person(val name: String?)

//...

val personStore = storeOf(Person(null), job = Job())

//...

val nameStore = personStore.map(Person.name()).mapNull("")
The other way around
You may also encounter special cases where you would like to apply the above-mentioned mapping the other way around: e.g. when dealing with a non-nullable data model in combination with a nullable data-binding of a component such as a combobox.
For those cases, use the mapNullable mapper function:
val nonNullableStore: Store<String> = storeOf("")

val nullableStore: Store<String?> =
    nonNullableStore.mapNullable(placeholder = "Unknown")
//                               ^^^^^^^^^^^^^^^^^^^^^^^
//                               When the parent has the specified placeholder value,
//                               the mapped Store will have `null` as its value.
Combining Lenses
A Lens supports the plus-operator with another lens in order to create a new lens which combines the two.
The get and set-functions of the resulting lens are chained in natural order.
Imagine the following example:
data class Address(val street: String)
data class Person(val address: Address)

val addressOfPerson: Lens<Person, Address> = lensOf("address", Person::address) { p, v -> p.copy(address = v) }
val streetOfAddress: Lens<Address, String> = lensOf("street", Address::street) { p, v -> p.copy(street = v) }

// combine two lenses:
val streetOfPerson = address + street

// apply the combined lens to an example object:
val person = Person(Address("Lerchenweg"))
streetOfPerson.get(person) // -> "Lerchenweg"
streetOfPerson.set("Rosenstraße") // Person(address = Address("Rosenstraße"))
Let's see how this example would work with automatically generated lenses.
@Lenses
data class Address(val street: String) { companion object }

@Lenses
data class Person(val address: Address) { companion object }

val streetOfPerson = Person.address() + Address.street()
This works, but the syntax is quite cumbersome, especially for deeper nested models.
fritz2's automatic @Lenses-annotation-processor has dedicated support for deeper nested models as well and
creates extension functions for all lenses. This allows you to chain the calls fluently:
@Lenses
data class Address(val street: String) { companion object }

@Lenses
data class Person(val address: Address) { companion object }

val streetOfPerson = Person.address().street()
This fluent API looks much terser and cleaner compared to the canonical one above. Note that, under the hood, nothing
special happens - the generated code simply uses the plus operator the same way you would.
Combining lenses is also very useful for formatting values, as we shall see in the next section.
Formatting Values
HTML allows only Strings in your attributes, for example the value attribute of input {}. To use other data
types in your model, you have to specify how a type should be represented as String (e.g. Number, Currency, Date).
When working with input {}, you also need parse the user input back to your data type.
For all Kotlin basic types, there is a convenience function asString() which generates a Lens from this type to
String and vice versa. It internally calls the T.toString() and String.toT() functions.
@Lenses
data class Person(val age: Int)

val ageLens: Lens<Person, Int> = Person.age() // cannot be used in tag attributes
val ageLensAsString: Lens<Person, String> = Person.age().asString() // now it is usable
Also, remember that you can use the lensOf() function to create lenses which we introduced in the lenses section:
fun <P> lensOf(format: (P) -> String, parse: (String) -> P): Lens<P, String>When using other types like kotlinx.datetime.LocalDate, special lenses for string conversion need to be specified for them:
import kotlinx.datetime.*

@Lenses
data class Person(val birthday: LocalDate)

object Formats {
    val date: Lens<LocalDate, String> = lensOf(LocalDate::toString, String::toLocalDate)
}
Now you can use the Formats.date lens for deriving stores:
val personStore = storeOf<Person>(Person(LocalDate(1990, 1, 1)), job = Job())

val birthday: Store<String> = personStore.map(Person.birthday() + Formats.date)
// or when an interim store is needed
val birthday: Store<String> = personStore.map(Person.birthday()).map(Formats.date)
Take a look at our complete validation example to get an impression of that topic.
Summary of Store-Mapping-Factories
| Factory | Use case |
|---|---|
Store<P>.map(lens: Lens<P, T>): Store<T> |
Most generic map-function. Maps any Store given a Lens. Use for model destructuring with automatic generated lenses for example. |
Store<P?>.map(lens: Lens<P & Any, T>): Store<T> |
Maps any nullable Store given a Lens to a Store of a definitely none nullable T. Use in render*-content expressions combined with a null check. |
Store<List<T>>.mapByElement(element: T, idProvider): Store<T> |
Maps a Store of a List<T> to one element of that list. Works for entities, as a stable Id is needed. |
Store<List<T>>.mapByIndex(index: Int): Store<T> |
Maps a Store of a List<T> to one element of that list using the index. |
Store<Map<K, V>>.mapByKey(key: K): Store<V> |
Maps a Store of a Map<T> to one element of that map using the key. |
Store<T?>.mapNull(default: T): Store<T> |
Maps a Store of a nullable T to a Store of a definitely none nullable T using a default value in case of null in source-store. |
Store<T>.mapNullable(placeholder: T): Store<T?> |
Maps a Store of T to a Store of T?, replacing the given placeholder from the parent with null in the sub Store. This function is the reverse equivalent of mapNull. |
MapRouter.mapByKey(key: String): Store<String> |
Maps a MapRouter to a Store. See chapter about routers for more information. |
Summary Lens-Factories
| Factory | Use case |
|---|---|
lensOf(id: String, getter: (P) -> T, setter: (P, T) -> P): Lens<P, T> |
Most generic lens (used by lenses-annotation-processor. Fits for complex model destructuring. |
lensOf(parse: (String) -> P, format: (P) -> String): Lens<P, String> |
Formatting lens: Use for mapping into Strings. |
lensForElement(element: T, idProvider: IdProvider<T, I>): Lens<List, T> |
Select one element from a list of entities, therefore a stable Id is needed. |
lensForElement(index: Int): Lens<List, T> |
Select one element from a list by index. Useful for value objects. |
lensForElement(key: K): Lens<Map<K, V>, V> |
Select one element from a map by key. |
lensForUpcasting(): Lens<Map<P, C> |
Casting lens: Interpret parent as specific subtype. Handles ClassCastException for render edge-cases |
Advanced Topics
Reactive Rendering of Entity-Lists With Auto-Mapped Element Store
There is a special convenience method for the reactive rendering of lists of
entities which requires some knowledge about Stores and Lenses.
On a store of List<T>, an extension method called renderEach is defined directly on the
store. It is mandatory to pass an idProvider, so this is targeted to entity-types.
Inside the content-parameter expression of renderEach, instead of just T, a Store<T> gets injected. Some
store-mapping takes place under the hood: For each element of the original list, a mapped store
handling that element from the original store is created.
val storedPersons: Store<List<Person>> = storeOf(listOf(Person(1, "fritz2", emptySet())), job = Job())

// needed for mapping an already mapped store to destructure the model further
val nameLens: Lens<Person, String> = lensOf("name", Person::name) { person, name -> person.copy(name = name) }

render {
    div {
        storedPersons.renderEach(Person::id) { storedPerson ->
        //            ^^^^^^^^^^^^^^^^^^^^^    ^^^^^^^^^^^^
        //            call directly on the     get a full `Store<Person>`
        //            store                    for each element

            val storedName = storedPerson.map(nameLens) // create this store to map it further

            // provide an input element in order to modify one property of that person
            input {
                value(storedName.data)
                changes.values() handledBy storedName.update
            }
        }
    }
}
Tables with editable cells are a typical use case for Store<List<T>>.renderEach.
Check out the boilerplate code that can be omitted in comparison to using the Flow<List<T>>.renderEach-function:
val storedPersons: Store<List<Person>> = storeOf(listOf(Person(1, "fritz2", emptySet())), job = Job())

val nameLens: Lens<Person, String> = lensOf("name", Person::name) { person, name -> person.copy(name = name) }

render {
    div {
        storedPersons.data.renderEach(Person::id) { person -> //  We get a `T`..

            // ... thus we must create the mapped store manually:
            val storedPerson = storedPersons.mapByElement(person, Person::id)

            // the same as above
            val storedName = storedPerson.map(nameLens)
            input {
                value(storedName.data)
                changes.values() handledBy storedName.update
            }
        }
    }
}
You might notice that the parameters of renderEach and mapByElement are identically. That's why it is possible
to encapsulate the store mapping directly into the former presented convenience function.
Dealing with sealed Type Hierarchies
There are special needs when you integrate sealed types into your model. It does not matter whether this is at the
root or nested inside your model-tree. There are always similar idioms that need to be applied. Those idioms need
special lenses, that will be generated by our lenses-annotation-processor for you.
Imagine the following example model:
import dev.fritz2.core.Lenses
import dev.fritz2.core.NoLens

@Lenses
sealed interface Wish {
    val label: String
    companion object
}

@Lenses
data class Wishlist(
  val name: String,
  val wishes: List<Wish>
) {
  companion object
}
As you can see, we want to model a wishlist, which simply holds a list of wishes.
A Wish is a sealed interface that defines a label for all common children. It is also annotated by the known
@Lenses-annotation in order to tell the annotation processor to create lenses for this base type too.
The WhishList simply serves as a root node of the model to integrate the sealed hierarchy into another type.
Our support for sealed type hierarchies has the following restriction:
All children of an annotated sealed base type need to be data classes that are themselves annotated with the @Lenses
annotation. The annotation processor will fail with an error if this constraint is violated.
There might be different kinds of wishes, though, which all differ in their special properties. Take those for example:
@Lenses
data class Computer(
    override val label: String,
    val ramInKb: Int
) : Wish {
    companion object
}

enum class Color {
  Blue, Red, Green, Purple, Yellow, Petrol
}

@Lenses
data class LightSaber(
  override val label: String,
  val color: Color
) : Wish {
  companion object
}
Our WhishList.wishes list can hold arbitrary objects of Computer and LightSaber, while both types need different
aspects to be well-defined:
- a computer needs RAM - as we refer to the good old homecomputer's era, we store those values in kilobytes.
- a lightsaber needs a color - as fritz2's logo is somewhat petrol, we make this possible for our merch.
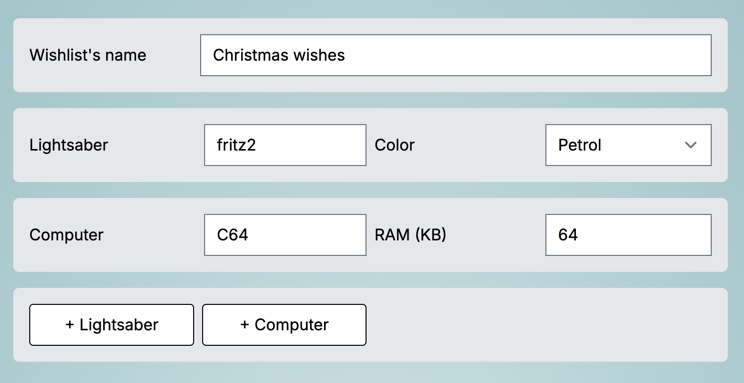
Look at an example with a Store of type WishList:
val wishlist = Wishlist(
    "Christmas wishes",
    listOf(
        LightSaber("fritz2", Color.Petrol),
        Computer("C64", 64)
    )
)

val storedWishList: Store<WishList> = storeOf(wishlist)
We would like to implement a small UI to manage those wishes. It might look similar to this:
The overall example is rather good domain modelling, but it imposes some problems when it comes to store-mapping:
- To map the main model down to the nodes of the tree (
Whislist -> wishes -> some single wish -> Computer -> ramInKb), there is the need to map a store of the base type to a specific type. As mapping involvesLenses, we need aLens<Wish, Computer>, for example. How could this be done? - Another difficulty arises by the fact that we also want to modify the common properties of the base type.
There is no implementation, though, so how should we implement thesetterof aLens<Wish, String>for theWhish.label-property?
There are solutions with simple idioms for those two problems that you can craft by hand. fritz2's lenses
processor creates the needed Lenses automatically for you, however.
The following two sections demonstrate the aforementioned solutions.
Up-Casting and Down-Casting Lenses
Let us recap the paths we need to take for a store-mapping from top to bottom elements:
Whislist -> wishes -> some single wish -> Computer -> ramInKbWhislist -> wishes -> some single wish -> LightSaber -> color
We will need the following lenses to realize those mappings:
// Lenses to map to `WhishList`-properties
val name: Lens<WhishList, String> = TODO()
val wishes: Lens<WishList, List<Wish>> = TODO()

// Lenses to map to single `Wish`
val singleWish: Lens<List<Wish>, Wish> = TODO()

// Lenses to map to *specific* child type
// This is das "hard" problem - we need to up-cast from base type to specific type
val computer: Lens<Wish, Computer> = TODO() // how could such an up-casting be implemented?
val lightSaber: Lens<Wish, LightSaber> = TODO()

// Lenses to map to specific `Computer`-properties
val ramInKb: Lens<Computer, Int> = TODO()

// Lenses to map to specific `LightSaber`-properties
val color: Lens<LightSaber, Color> = TODO()
The two problematic lenses are the ones that need to implement the up-casting from the base type to the specific type:
Lens<Wish, Computer>Lens<Wish, LightSaber>
We need to know the specific type which we can typically solve with an appropriate when-expression.
Remember the type notation of the getter-property of a Lens<P, T> is (P) -> T which would translate to
(Wish) -> Computer in our example case. To obtain the correct return type, we can simply cast inside the
getter-expression of our Lens to the specific type:
val computerLens: Lens<Wish, Computer> = lensOf(
    id = "", // as this Lens does not change the "position" inside the tree, we preserve the overall `path`
    getter = { it as Computer },
    //         ^^^^^^^^^^^^^^
    //         we need the getter to return the correct, specific type!
    //         as we know the type, we can simply cast the object held inside the `wishes`-list
    setter = { _, v -> v }
)
As the setter has the type notion (Wish, Computer) -> Wish we can simply return the value as it is. It already has
the correct specific type.
Casting from the base type to a more specific type is called up-casting. Since we apply this to a lens, we call this kind of lens up-casting lens.
But beware that the above code behaves still a bit brittle, as we do not cope with casting problems!
That's why fritz2 offers a dedicated lens factory for this use case: lensForUpcasting:
val computerLens: Lens<Wish, Computer> = lensForUpcasting<Wish, Computer>()Our automatic lens generator relies on this factory too. So strive to use this, if you craft your up-casting lenses manually.
Armed with such an up-casting lenses, we can easily access or change values of our example WishList-object:
val wishlist = Wishlist(
    "Christmas wishes",
    listOf(
        LightSaber("fritz2", Color.Petrol),
        Computer("C64", 64) // index of 1 in list
    )
)

val upcastingLens: Lens<Wish, Computer> = lensForUpcasting<Wish, Computer>()

// craft a lens to access the `Computer.raminKb`-property from a `WishList` by combining the
// intermediate lenses by `+`-operator:
val ramInKbLens: Lens<Wishlist, Int> =
    Wishlist.wishes() + lensForElement(1) + upcastingLens + Computer.ramInKb()
//  ^^^^^^^^^^^^^^^^^   ^^^^^^^^^^^^^^^^^   ^^^^^^^^^^^^^   ^^^^^^^^^^^^^^^^^^
//  |                   |                   |               generated by annotation
//  |                   |                   |
//  |                   |                   apply our handcrafted up-casting lens to
//  |                   |                   cast from `Wish` base type to `Computer`
//  |                   |
//  |                   use fritz2's factory for index based lens creation
//  |                   remember that the computer has index `1`!
//  |
//  generated by annotation

val upgradedList = ramInKbLens.set(wishlist, 512)

println(ramInKbLens.get(wishlist)) // prints: 64
println(ramInKbLens.get(upgradedList)) // prints: 512
As mentioned before, fritz2's annotation processor will generate those up-casting lenses for you.
They are named after the classname starting with a lowercase letter. Thus, Computer will have computer() as it's
factory name.
We can now use this to map the Store and provide some form elements to change the state:
val storedWishList: Store<WishList> = storeOf(wishlist)
val storedWishes = storedWishList.map(Wishlist.wishes())
storedWishList.data.map { it.wishes.withIndex().toList() }.renderEach { (index, wish) ->
    val storedWish = storedWishes.mapByIndex(index)
    when (wish) {
        is LightSaber -> {
            // we are now safe to up-cast to `LightSaber`-type!
            val storedColor = storedWish.map(Wish.lightSaber().color())
            //                                    ^^^^^^^^^^^^
            //                                    use generated up-casting lens
            label {
                +"Color"
                `for`("$index")
            }
            select(id = "$index") {
                changes.values().map { Color.valueOf(it) } handledBy storedColor.update
                Color.entries.forEach { color ->
                    option {
                        value(color.name)
                        selected(storedColor.data.map { it == color })
                        +color.name
                    }
                }
            }
        }

        is Computer -> {
            // we are now safe to up-cast to `Computer`-type!
            val storedRam = storedWish.map(Wish.computer().ramInKb().asString())
            //                                  ^^^^^^^^^^
            //                                  use generated up-casting lens
            label {
                +"RAM (KB)"
                `for`("$index")
            }
            input(id = "$index") {
                type("text")
                value(storedRam.data)
                changes.values() handledBy storedRam.update
            }
        }
    }
}
As there may be use-cases where we need to access the other way round, fritz2 also creates so called down-casting lenses for each child of a sealed base type.
Those are lenses, that have a specific type as their parent and the base type as the lens's outcome.
Translated to the example there is a Lens-factory created on the type LightSaber called wish() that looks like
this:
public fun LightSaber.Companion.wish(): Lens<LightSaber, Wish> = lensOf(
    "",
    { it },
    { _, v -> v as LightSaber }
    //        ^^^^^^^^^^^^^^^
    //        because `v`is of type `Wish` we need to cast it "back" into the specific parent type
)
Delegating Lenses
The second problem of sealed type hierarchies is the access of the common properties.
As a sealed base-type is an interface or an abstract class and not a data class, there is no copy()-function
we could use in order to provide a useful setter implementation!
Let us illustrate the problem for the Wish.label-property:
val labelLens: Lens<Wish, String> = lensOf(
    id = "label",
    getter = Wish::label, // accessing is easy, but...
    setter = { parent, value -> TODO() }
    //                          ^^^^^^
    //                          ... there is no way to set the value back into the parent!
)
There is only one option: We must delegate the "work" to the children of the base type.
Remember: those need to be data classes, so we can rely on their copy()-capabilities to solve this problem:
val labelLens: Lens<Wish, String> = lensOf(
    id = "label",
    getter = { parent ->
        // separate the different types...
        when(parent) {
            is Computer -> parent.label
            //             ^^^^^^^^^^^^
            //             ... and delegate the access to the child type
            is LightSaber -> parent.label
        }
    },
    setter = { parent, value ->
        // separate the different types...
        when(parent) {
            is Computer -> parent.copy(label = value)
            //                    ^^^^
            //                    ... and delegate the setter work to the child type
            //                    by calling its `copy`-function.
            is LightSaber -> parent.copy(label = value)
        }
    }
)
Because the work is delegated to the different child types, we call this kind of lens delegating lens.
As this is tedious to write, the fritz2's annotation processor will create those lenses for you. Because it needs to
be sure it can use the copy()-functions, there is the restriction that every child of a sealed base type needs
to be a data class!
You have already heard about this at the start of top level section, but now you understand the reason for that.
Now we can provide an input-field for the common label-property that gets mapped to the appropriate
child object's field:
val storedWishList: Store<WishList> = storeOf(wishlist)
val storedWishes = storedWishList.map(Wishlist.wishes())
storedWishList.data.map { it.wishes.withIndex().toList() }.renderEach { (index, wish) ->
    val storedWish = storedWishes.mapByIndex(index)
    val storedLabel = storedWish.map(Wish.label())
    //                               ^^^^^^^^^^^^
    //                               use the generated delegating-lens to get
    //                               a store of the common property for each instance
    label {
        +"Label"
        `for`("$index-label")
    }
    input(id = "$index-label") {
        type("text")
        value(storedLabel.data)
        changes.values() handledBy storedLabel.update
    }
}
Exclude Fields from Lenses Generation
Sometimes you may not want to create a Lens for each public field of a sealed base type.
Typical use cases may be properties that should be static for all instances, like some kind of display
name of the type.
For those cases fritz2 offers the @NoLens-annotation.
You can simply annotate any public property of a sealed base type to exclude this property from the automatic lenses generation process.
@Lenses
sealed interface Wish {
    val label: String

    // Just annotate a property like this and no (delegating) lens is created
    @NoLens
    val typeName: String

    companion object
}

@Lenses
data class Computer(
    override val label: String,
    val ramInKb: Int
) : Wish {
    // cannot be changed, so there is no need for a lens!
    // (and no implementation that would make any sense - no setter possible!)
    override val typeName: String = "Computer"

    companion object
}
Complete Wishlist Example
As this example is rather complex, the full working implementation of the preceding wishlist code snippets can be found below. The styling is done with tailwindcss, so you can copy and paste it in our well known fritz2-tailwind-template project:
// somewhere in your `commonMain`-source-set:
import dev.fritz2.core.Lenses
import dev.fritz2.core.NoLens

@Lenses
sealed interface Wish {
    val label: String
    @NoLens
    val typeName: String
    companion object
}

@Lenses
data class Computer(
    override val label: String,
    val ramInKb: Int
) : Wish {
    override val typeName: String = "Computer"
    companion object
}

enum class Color {
    Blue, Red, Green, Purple, Yellow, Petrol
}

@Lenses
data class LightSaber(
    override val label: String,
    val color: Color
) : Wish {
    override val typeName: String = "Lightsaber"
    companion object
}

@Lenses
data class Wishlist(
    val name: String,
    val wishes: List<Wish>
) {
    companion object
}

// put this in your `App.kt` inside the `jsMain`-source-set:
render {
    val wishlist = Wishlist(
        "Christmas wishes",
        listOf(
            LightSaber("fritz2", Color.Petrol),
            Computer("C64", 64)
        )
    )

    val storedWishList = storeOf(wishlist)
    val addWish = storedWishList.handle<Wish> { state, new ->
        state.copy(wishes = state.wishes + new)
    }

    form {
        div("bg-gray-200 m-4 p-4 rounded-md grid grid-cols-4 items-baseline") {
            val storedName = storedWishList.map(Wishlist.name())
            label {
                +"Wishlist's name"
                `for`("name")
            }
            input("col-span-3 p-2 rounded", id = "name") {
                type("text")
                value(storedName.data)
                changes.values() handledBy storedName.update
            }
        }

        val storedWishes = storedWishList.map(Wishlist.wishes())
        storedWishes.data.map { it.withIndex().toList() }.renderEach { (index, wish) ->
            val storedWish = storedWishes.mapByIndex(index)
            div("bg-gray-200 m-4 p-4 rounded-md grid grid-cols-4") {
                ul("grid grid-cols-subgrid col-span-4 gap-2") {
                    li("grid grid-cols-subgrid col-span-2 items-baseline") {
                        val storedLabel = storedWish.map(Wish.label())
                        label {
                            +wish.typeName
                            `for`("$index-label")
                        }
                        input("p-2 rounded", id = "$index-label") {
                            type("text")
                            value(storedLabel.data)
                            changes.values() handledBy storedLabel.update
                        }
                    }
                    li("grid grid-cols-subgrid col-span-2 items-baseline") {
                        when (wish) {
                            is LightSaber -> {
                                val storedColor = storedWish.map(Wish.lightSaber().color())
                                label {
                                    +"Color"
                                    `for`("$index")
                                }
                                select("w-full p-2 rounded", id = "$index") {
                                    changes.values().map { Color.valueOf(it) } handledBy storedColor.update
                                    Color.entries.forEach { color ->
                                        option {
                                            value(color.name)
                                            selected(storedColor.data.map { it == color })
                                            +color.name
                                        }
                                    }
                                }
                            }

                            is Computer -> {
                                val storedRam = storedWish.map(Wish.computer().ramInKb().asString())
                                label {
                                    +"RAM (KB)"
                                    `for`("$index")
                                }
                                input("p-2 rounded", id = "$index") {
                                    type("text")
                                    value(storedRam.data)
                                    changes.values() handledBy storedRam.update
                                }
                            }
                        }
                    }
                }
            }
        }
        div("bg-gray-200 m-4 p-4 rounded-md grid grid-cols-4 gap-2 items-baseline") {
            button("border border-black bg-white p-2 rounded") {
                +"+ Lightsaber"
                clicks.map { LightSaber("", Color.Blue) } handledBy addWish
            }
            button("border border-black bg-white p-2 rounded") {
                +"+ Computer"
                clicks.map { Computer("", 16) } handledBy addWish
            }
        }
    }
}
The above example is intentionally simply structured in order to reduce complexity and show the code in a straight-forward manner.
For real world application we encourage you to apply better structure and divide the UI into smaller and reusable parts, of course.